Gravity Forms Integration With Pipeline CRM

A Step-by-Step Guide using Zapier.

Gravity Forms integrates with Pipeline CRM. The goal is to automate lead capturing from the website and send lead data directly to Pipeline CRM to eliminate the manual work and create an efficient system that saves time and resources.

Gravity Forms

A Quick Overview:

By following these steps, you can integrate Pipeline CRM with Gravity Forms using Zapier. This integration enables the automatic creation of contacts or leads in Pipeline CRM when form entries are submitted through Gravity Forms on your WordPress website. The integration streamlines your lead capture process, reduces manual work, and ensures accurate and efficient data transfer to Pipeline CRM.

1. Sign up for accounts:

  • Create an account on Pipeline CRM (if you haven’t already).
  • Sign up for a Zapier account at zapier.com.
  • Ensure you have access to a WordPress website with Gravity Forms installed.

2. Set up the Gravity Forms trigger in Zapier:

Before diving into the integration process, I’d like to provide a heads-up if you haven’t authenticated your Gravity Forms with Zapier account yet. It can be a slightly confusing process, but don’t worry! I’m here to guide you through each step, and I’ve also prepared a helpful screen recording for you to follow along. Let’s get started!

You can use the Zap template bellow which will save you time:

  • Log in to your Zapier account.
  • Click on the “Make a Zap!” button to create a new Zap.
  • Choose Gravity Forms as the trigger app.
  • Select the specific trigger event, such as “Form Submission in Gravity Forms.”
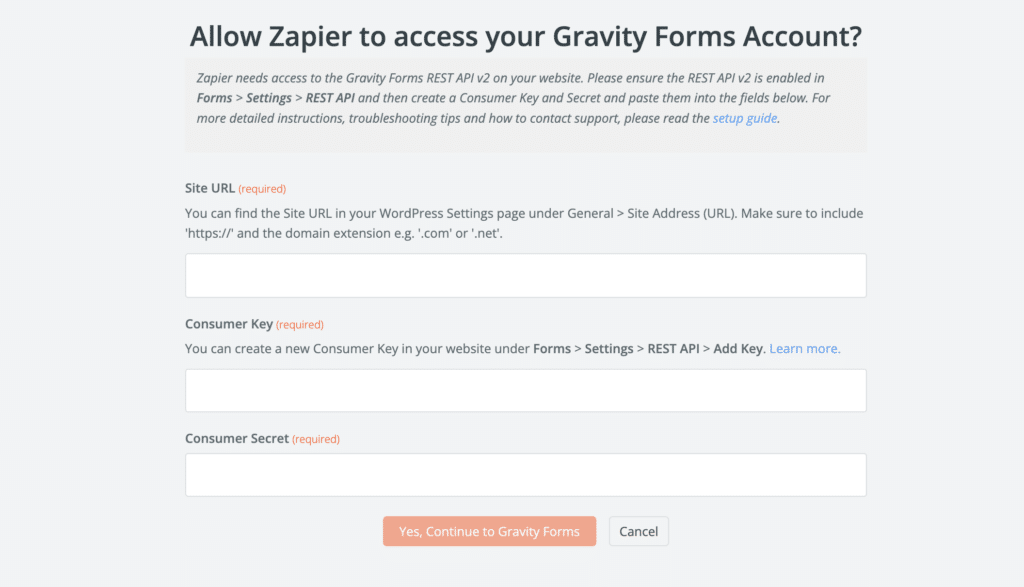
  • Authenticate Gravity Forms account with Zapier account by clicking on “Sign in”. After that Zapier will open a new window which says: “Allow Zapier to access your Gravity Forms Account?” (see the screenshot below)
Zapier Gravity Froms Access Window
The Authentication process might be somewhat cumbersome but don’t worry. I’ll walk you through the entire process:
  • Install the Gravity Forms plugin on your WordPress website if you haven’t yet. 
  • Activate the Gravity Forms plugin with your license key, which can be found in your Gravity Forms account
  • In your Gravity Forms plugin, go to the “Add-Ons” menu.
  • Find “Zapier Add-On” from the list and install it. Once the installation has been completed, make sure to activate it.
  • After you’ve activated the Zapier add-on, go to the Gravity Forms plugin and click on the “Settings” tab. 
  • Within the settings menu, you’ll see the “REST API” tab; click on it. 
  • Now you should be looking at the “Add New Key” modal window. In the “description.” field, type “Zapier Key”, then select a user from a dropdown, In the “Permissions” field select “Read/Write” and click on “add” button.
  • You should see Consumer Key and Consumer Secret fields. DON’T close the window. Navigate to your Zapier authentication window(should look like on the screenshot above) and copy/paste Consumer Key and Consumer Secret into respective fields. Also, don’t forget to copy/caste your website URL into “Site URL” field.
  • Click on “Yes, Continue to Gravity Forms” and you should be good to go with setting up your zap. 

3. Set up the Pipeline CRM action in Zapier:

I’ve created a test form where a user can request a quote for landscaping services. I went ahead and filled out a form with some test data, which we’ll be using in the mapping process between form fields and “Person” fields in Pipeline CRM account.

 
  • Select the Gravity Forms form you want to use for the integration.
  • Test the trigger to ensure it’s working correctly, i.e. pulling form’s submission data.
  • Choose Pipeline CRM as the action app in Zapier.
  • Select the desired action, such as “Create Person in Pipeline CRM.”
  • Connect your Pipeline CRM account to Zapier.
  • Map the form fields from Gravity Forms to the corresponding fields in Pipeline CRM.
  • Customize the contact or lead details according to your requirements.Test the action to ensure it’s working properly.

4. Configure additional options:

  • Depending on your needs, you can set up additional steps or filters in the Zapier Zap. For example, you can add conditions or data transformations to refine the data being transferred or perform other actions.

5. Test the integration:

  • Open your WordPress website in a new tab.
  • Submit a test entry through the form.
  • Monitor Zapier to verify that the trigger and action are executed.
  • Check Pipeline CRM to confirm that the contact or lead is created with the relevant details.

6. Refine and monitor the integration:

  • Review the integration to ensure the data mapping and transfer meet your requirements.
  • Make any necessary adjustments or refinements based on your workflow or specific needs.
  • Monitor the integration periodically to ensure its continued functionality and address any potential issues.

7. You did it!

With successful automation of lead capturing from your website form, your sales team can now shift their focus to what truly matters – nurturing leads and driving sales growth. By streamlining the process of capturing leads automatically, you have eliminated the manual work and created an efficient system that saves time and resources.

Table of Contents